Reverse and void a claims batch
Reverse and void multiple pended EDI claims from a trading partner![]() An entity which sends and/or receives electronic health care transactions (i.e.: provider, billing group, billing service, clearinghouse or payer.) or a list of paid claims rather than manually adjusting individual claims. For example, if Anthem voided and re-issued some paid claims, you'll need to void the original claims and then re-issue them. You can create a claims list and reverse them in a batch rather than manually voiding each claim or adjust the original paid claim from a trading partner to a new pended claim (configuration required).
An entity which sends and/or receives electronic health care transactions (i.e.: provider, billing group, billing service, clearinghouse or payer.) or a list of paid claims rather than manually adjusting individual claims. For example, if Anthem voided and re-issued some paid claims, you'll need to void the original claims and then re-issue them. You can create a claims list and reverse them in a batch rather than manually voiding each claim or adjust the original paid claim from a trading partner to a new pended claim (configuration required).
Paid claims
Create a list of claims to adjust, then enter the list on the Batch Reverse/Void screen to reverse (and void, if necessary).
Create a claims list
Go to: Home > Administration Processes > Claims Adjustments > Create Auto Adjustment List
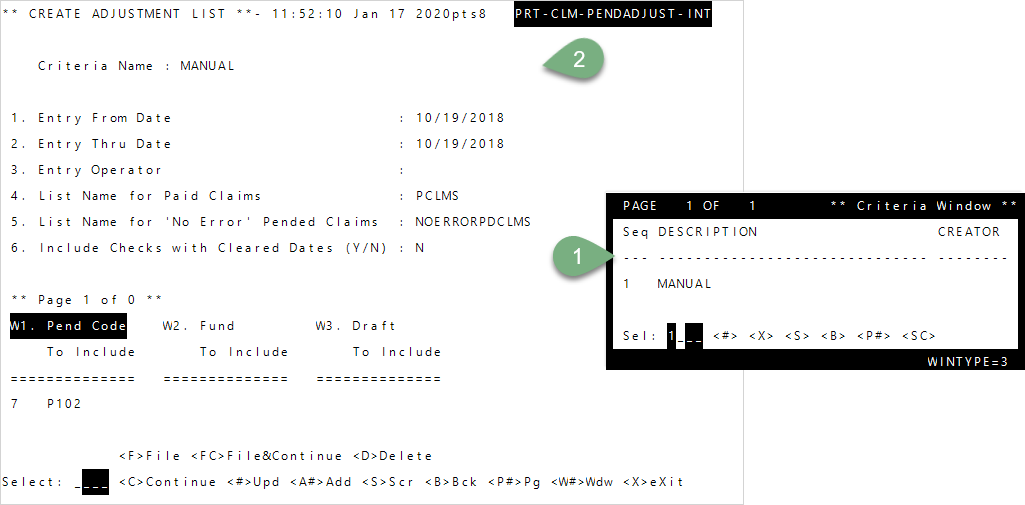
Enter to move through the fields or after typing a command at the Select line.- To create a new list, enter
1—Manual, or enter the Seq number of an existing list (the instructions below are for creating a new list). Then, pressEnter.- Enter the Entry From and Thru date range of the claims to include. Type the date in MMDDYYY format.
- The
Entry Operatorupdates with your ID after you tab through it. - Depending on your list type:
- Enter a name for the
Paid Claimslist. - Enter a name for the
'No Error' Pended Claimslist.
- Enter a name for the
- To include checks with cleared dates, enter
Yat prompt 6, or enterNto remove any checks that have been cleared. - Enter the
Pend Code,Fund, orDraftto include in your list at the appropriateWfields. For example, the list shown above will include claims that pended P102.
- Enter
FC—File & Continueto save your criteria orC—Continueto generate the new adjustment list without saving your list criteria.- If you chose file and continue, enter a
Criteria Namefor your list.
- If you chose file and continue, enter a
-
 All claims meeting the criteria you chose are evaluated and any errors are listed in the resulting report (see the Adjustment claims error report descriptions below ). The Process ID Number and the Job Number show in the upper-right of the screen and the results are sent to the spooler
 The Spooler Manager displays the print jobs and information about each job.. See the Print queue—Retrieve a print job topic.Adjustment claims error report descriptions
- Review the error report results and follow the directions in the table as appropriate. If you're exporting the report, we recommend printing or exporting in landscape.
Reverse the claims list
Reverse (and void, if necessary) the batch of paid claims.
Go to: Home > Administration Processes > Claims Adjustments > Batch Reverse/Void
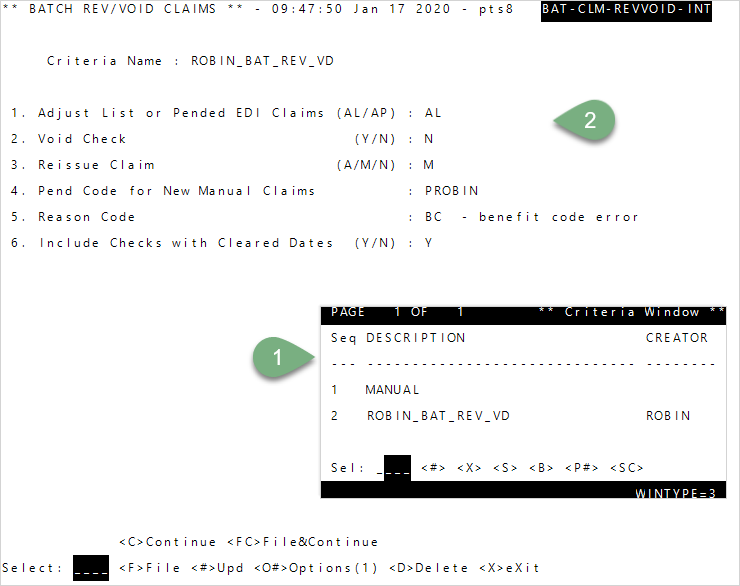
- To enter your own criteria, enter
1—Manual, or enter the Seq number for a saved list (criteria) from theCriteria Windowand pressEnter. -
At prompt 1, enter
ALto adjust a list of paid claims. - Enter
YatVoid Checkto void the checks in the list. EnterNif no checks were processed. - Choose if you will
Reissue Claim(s):- Enter
Ato automatically create new claims for the adjusted claims. - Enter
Mto manually create new claims. Enter the pend code for the new claims next. - Enter
Nif you don’t want new claims created.
- Enter
- If you chose to manually create new claims, enter the
Pend Code for New Manual Claimsto apply to the claims. This field isn’t needed if you’re reissuing claims automatically or not creating new claims. -
Enter the
Reason Code(a code that identifies the adjustment reason). EnterALLto display a window with codes to select from, or type=and aCross Referencefield displays at the bottom of the screen.The software includes a
list of standard reason codes to choose from, but your system might also have user-defined codes. -
At the select line, enter
C.
- At
List of Claims to Adjust, enter the name of the list you created in step 1. - Enter a name for the adjusted claims with no errors at
List name of Adjustment Claims with no error. You can use the list in a report to show claims that can be released by an operator or through auto adjudication (go toDisplays, Data Preps, Reports >> Claims Processing >> Pend/Pre-Auth/Denial). - Enter a list name for any claims that have errors at
List name of Adjustment Claims with error. You can recall the list and revisit these claims at a later time. - Enter
Cat the select line to continue. - Informational messages display, including the spooler ID. Press
Enterto exit the screen. - Review the two generated results on the spooler: one shows any claims that couldn’t be adjusted and why, the other provides the list of claims that can be released or updated. See report examples.
- At
Reverse a batch of pended EDI claims
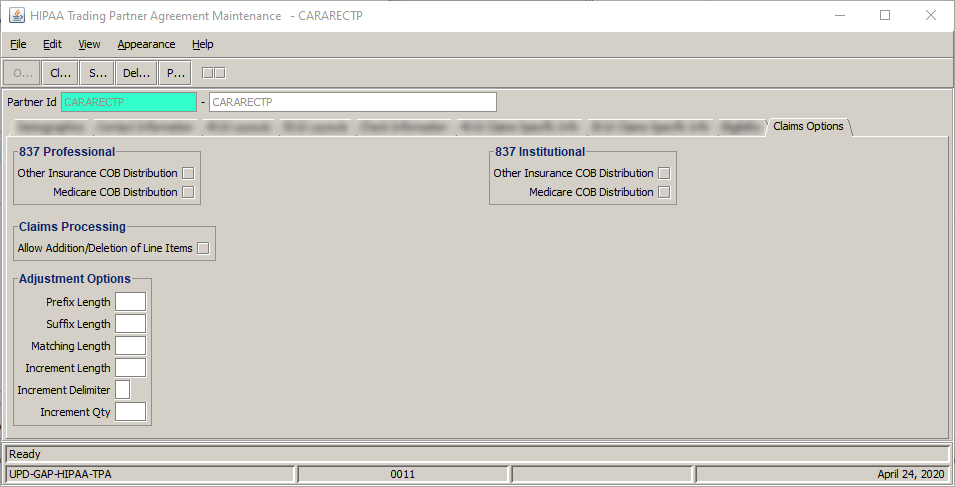
Reverse ( and void, if necessary) pended EDI claims. You'll have to ![]() set up adjustment options in Trading Partner Maintenance Agreement before doing so.
set up adjustment options in Trading Partner Maintenance Agreement before doing so.

Go to: Home > Administration Processes > Claims Adjustments > Batch Reverse/Void

- To enter your own criteria, enter
1—Manual, or enter the Seq number for a saved list (criteria) from theCriteria Windowand pressEnter. - At prompt 1 enter
APto adjust pended EDI claims. - Enter
YatVoid Checkto void the checks in the list. EnterNif no checks were processed. Prompt 4 defaults toN, and prompt 5 is skipped by default. -
Enter the
Reason Code(a code that identifies the adjustment reason). EnterALLto display a window with codes to select from, or type=and aCross Referencefield displays at the bottom of the screen.The software includes a
list of standard reason codes to choose from, but your system might also have user-defined codes. -
At the select line, type
C.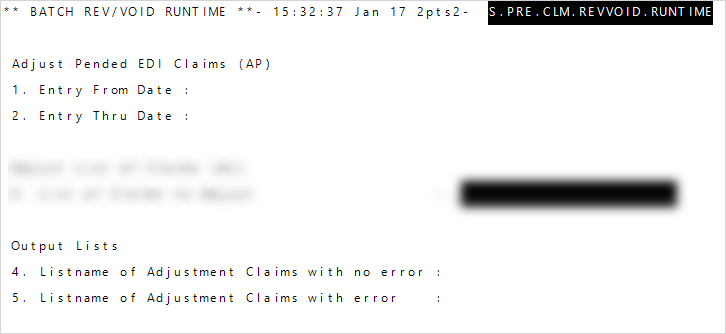
- Enter the Entry From and Thru dates to process.
- Enter a name for the adjusted claims at
List name of Adjustment Claims with no error. You can use the list in a report to show claims that can be released by an operator or through auto adjudication (go toDisplays, Data Preps, Reports >> Claims Processing >> Pend/Pre-Auth/Denial). - Enter a list name for any claims that do have an error at
List name of Adjustment Claims with error. You can recall the list and revisit these claims at a later time. - Enter
Cat theSelectprompt to continue. - Informational messages display, including the spooler ID. Press
Enterto exit the screen. - Review the two generated results on the spooler: one shows any claims that couldn’t be adjusted and why, the other provides the list of claims that can be released or updated.
Sample reports
Claims with no errors

Claims with errors
