Action option
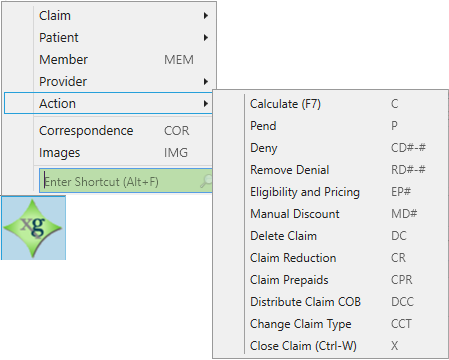
From the Action option, you can do the following:
Calculate (F7) a claim
Pend a claim
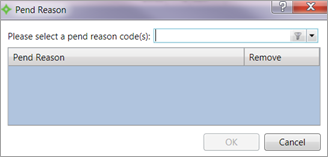
The pend![]() A discount or set contribution amount that is credited to the employer reducing the contribution obligation. option allows you to pend a claim. When you choose this option, the Pend Reason window displays.
A discount or set contribution amount that is credited to the employer reducing the contribution obligation. option allows you to pend a claim. When you choose this option, the Pend Reason window displays.
- To enter a pend reason code, use the list to select the necessary code and then click
OK. The Pend Reason code displays in the table. - To delete a pend reason code, click
Remove, use the list to select the necessary code to remove, and then clickOK.
Deny a claim
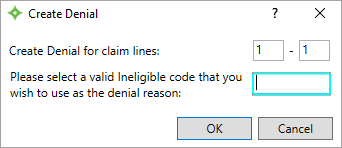
The Deny option allows you to deny a claim. When you choose this option, the Create Denial dialog displays.
- To deny a claim, enter the claim lines to deny. You can deny an entire claim by selecting all lines or you can select a portion of the claim.
-
Enter a valid ineligible code as the denial reason.
- Click
OK. The Ineligible Code on the Lines workspace updates with the Ineligible Code that you entered as well as the corresponding Ineligible Amount.
Remove a claim denial
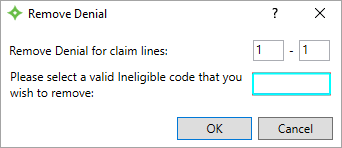
The Remove Denial option allows you to "undo" the denial of a claim. When you choose this option, the Remove Denial dialog displays.
- To remove a claim denial, enter the claim lines containing the denial code to remove.
-
Enter the ineligible code to remove from the claim lines.
Hint: If you don't know the correct code, use the shortcut keysCtrl + Lto access the code look-up. - Click
OK. The Lines workspace Ineligible Code that you selected is removed from the Lines workspace.
Add eligibility and pricing information
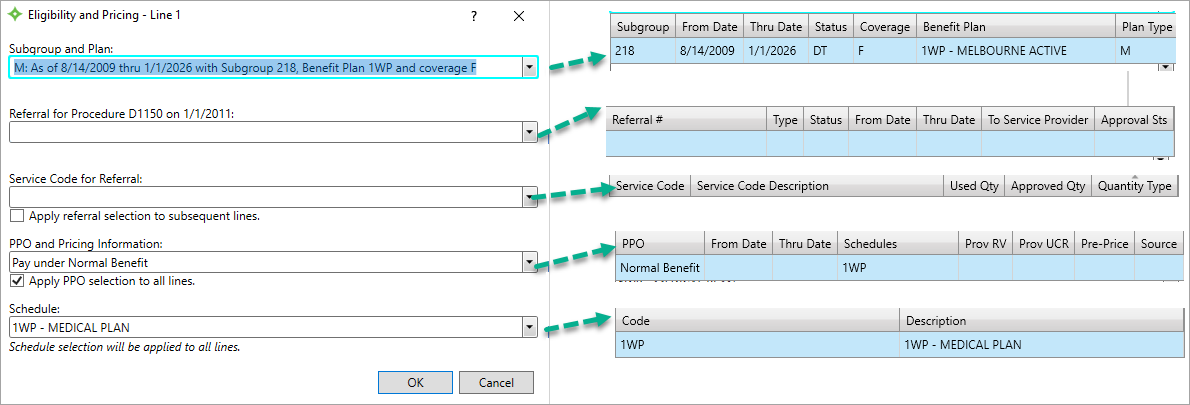
The Add Eligibility and Pricing Information option allows you to determine certain eligibility coverage information that is used to process the claim correctly.
| Field | Description |
|---|---|
|
Apply PPO selection to all lines. |
Check box that applies the selected PPO and pricing information to all claim lines. |
| Apply referral selection to subsequent lines |
Check box that applies the selected service code to future claims lines. |
| PPO and Pricing Information |
|
| Referral for Procedure <procedure code> on <date of procedure> |
|
| Schedule | A payment criteria summary including benefit codes, co-insurance percentages, accumulators, and pricing guidelines that automates the claims benefit determination. |
| Service Code for Referral |
Indicates if the quantity is a dollar amount or number of visits. |
| Subgroup and Plan |
|
All five fields display when accessing this option from the Star menu.When you're not using the Star menu, this window might display automatically as part of an edit, particularly a BCode edit. If it is part of an edit, only the applicable edit fields display.
The fields on the Eligibility and Pricing window are independent of each other. The subgroup![]() A way to categorize group members into a certain set for benefit plans (e.g. active and retired employees). Subgroup distinctions are only used in Claims, COBRA and Eligibility. and Plan, and schedule
A way to categorize group members into a certain set for benefit plans (e.g. active and retired employees). Subgroup distinctions are only used in Claims, COBRA and Eligibility. and Plan, and schedule![]() Defines parameters for Apps, contracts, status', pay, benefits, rules, etc.. fields display together, and the Referral for Procedure field and possibly the Service Code for Referral field might display together depending upon the situation.
Defines parameters for Apps, contracts, status', pay, benefits, rules, etc.. fields display together, and the Referral for Procedure field and possibly the Service Code for Referral field might display together depending upon the situation.
Select the appropriate information from the options. Refer to the Eligibility and Pricing field descriptions above.
Enter a manual discount
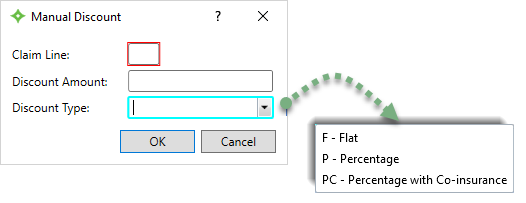
The Manual Discount option allows you to enter a discount arrangement with a provider. When you choose this option, the Manual Discount dialog displays.
- Enter the appropriate claim line.
- Enter the discount amount.
- Select the type of discount.
- Click
OKto apply the discount to the claim.
Delete a claim
When you choose the delete a claim option, a confirmation message displays.
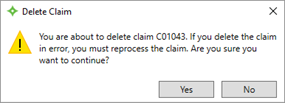
Click Yes to delete the claim or No to cancel.
Add a claim reduction
According to federal regulations, providers that don't preauthorize benefits when the fund requires authorization are subject to provider sanction. Applying the sanction involves the reduction of the plan allowance by either a percentage or flat dollar amount. The sanction reduction is applied to each line and the provider is considered responsible.
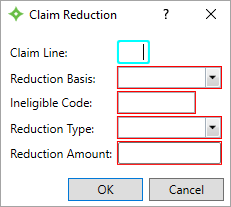
When you choose the Claim Reduction option, the Claim Reduction dialog displays. From here, you can choose either a flat amount or a percentage reduction at the line or claim level. You must have the appropriate permissions to access this option.
- In the
Claim Linebox, enter the Line Number for the claim reduction, leave it blank or enter0to take the reduction on the entire claim. - In the
Reduction Basis, select eitherB(Billed) orA(Allowed). The reduction will be taken off this field. - In the
Ineligible Codebox, enter the valid Ineligible Code for the reduction. - Select the
Reduction Type. Choose eitherF(Flat) orP(Percentage). - In the
Reduction Amountbox, type the flat or percentage dollar amount. - Click
OK. -
The Ineligible Code and Amount displays on the Lines workspace and the recalculated values display on the Detail viewport.
Add or update claim prepaids
The Claim Prepaids option allows you to add, update, or delete Member, Medicare, and Other (insurance carrier) prepaid information if you have the appropriate authorization.
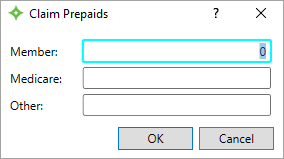
Click OK to update the information on the Lines workspace and the Prepaids viewport.
Distribute benefits across claim lines
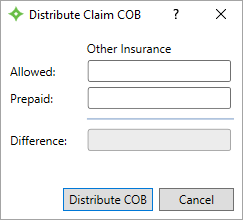
The Distribute Claim COB![]() A provision for determining benefits when a member has more than one benefit plan. option allows you to enter and distribute claim-level Other insurance Paid and Allowed Amounts across the claim lines. It also removes the discount information from the Ineligible Code and Ineligible Amount on the Lines workspace and removes the Ineligible Code, Ineligible Amount, and Considered Amounts from the pend P24—Prepricing Information.
A provision for determining benefits when a member has more than one benefit plan. option allows you to enter and distribute claim-level Other insurance Paid and Allowed Amounts across the claim lines. It also removes the discount information from the Ineligible Code and Ineligible Amount on the Lines workspace and removes the Ineligible Code, Ineligible Amount, and Considered Amounts from the pend P24—Prepricing Information.
There must be a PPO![]() A group of providers who contract with employers, insurers or administrators to provide services to individuals for a negotiated amount. on the claim and that PPO must be the retained PPO
A group of providers who contract with employers, insurers or administrators to provide services to individuals for a negotiated amount. on the claim and that PPO must be the retained PPO![]() A group of providers who contract with employers, insurers or administrators to provide services to individuals for a negotiated amount. setup in your system to remove these discounts. If the PPO isn't set to be retained, the discounts are removed from the Ineligible Code, Ineligible Amount, and Considered Amounts in pend P24 when the claim is calculated, but the Ineligible Code and Ineligible Amount on the Lines workspace won't be removed.
A group of providers who contract with employers, insurers or administrators to provide services to individuals for a negotiated amount. setup in your system to remove these discounts. If the PPO isn't set to be retained, the discounts are removed from the Ineligible Code, Ineligible Amount, and Considered Amounts in pend P24 when the claim is calculated, but the Ineligible Code and Ineligible Amount on the Lines workspace won't be removed.
- Enter the
AllowedandPrepaid Other Insuranceamounts. - The
Differenceupdates automatically. - Click
Distribute COB.
Change the claim type
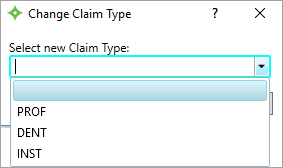
The Change Claim Type allows you to change the type of an in-progress claim, for example, from Professional to Dental.
When you choose the Change Claim Type (CCT) option, the Change Claim Type dialog displays.
- Select the new claim type.
- Click
OK. -
The claim type you selected is added to your claim and the claim recalculates and you may need to review the claim.
Close a claim (Ctrl + W)
When you choose the Close a claim option, if you have saved your changes the claim closes.
-
If you have unsaved changes, a confirmation message displays.

- Click
Saveto save your changes and exit,Don't Saveto exit without saving your changes, orCancelto remain in the record without saving.