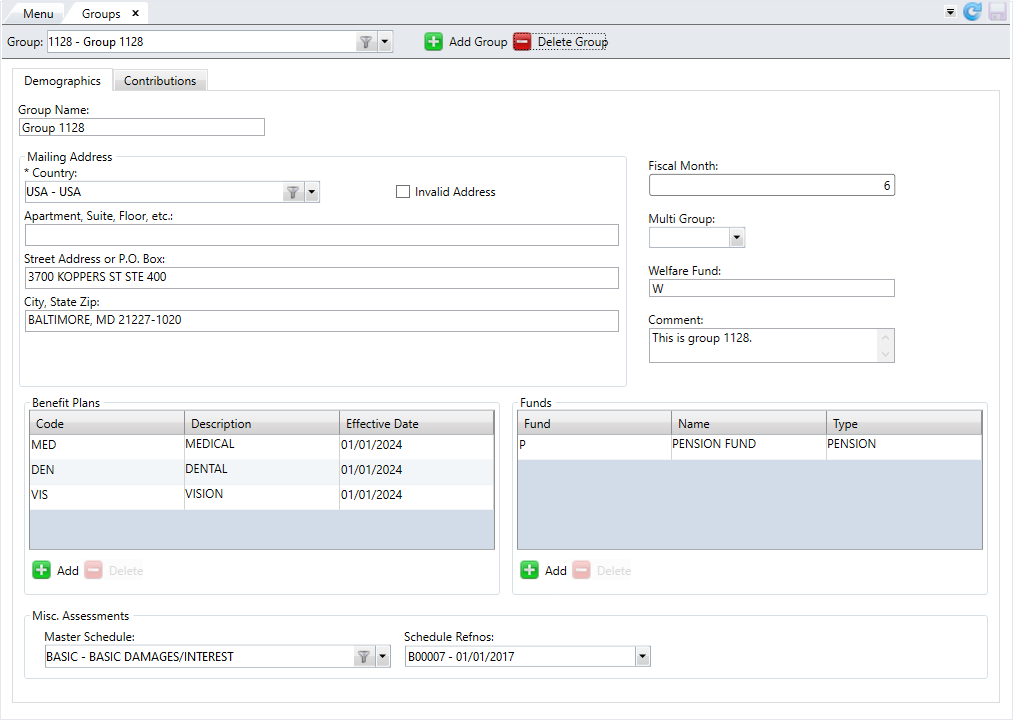
Manage Groups
A group![]() A set of members with similar characteristics, (i.e., same type of work, such as plumbers or electricians, or geographic location). is a set of people who contribute to a fund and receive benefits. A single fund can include multiple groups, or a single group can contribute to multiple funds. Manage groups on the
A set of members with similar characteristics, (i.e., same type of work, such as plumbers or electricians, or geographic location). is a set of people who contribute to a fund and receive benefits. A single fund can include multiple groups, or a single group can contribute to multiple funds. Manage groups on the Groups screen.
Go to: Home > Codes and Criteria > Fund Relationships > Groups
* indicates a required field
| Field | Description |
|---|---|
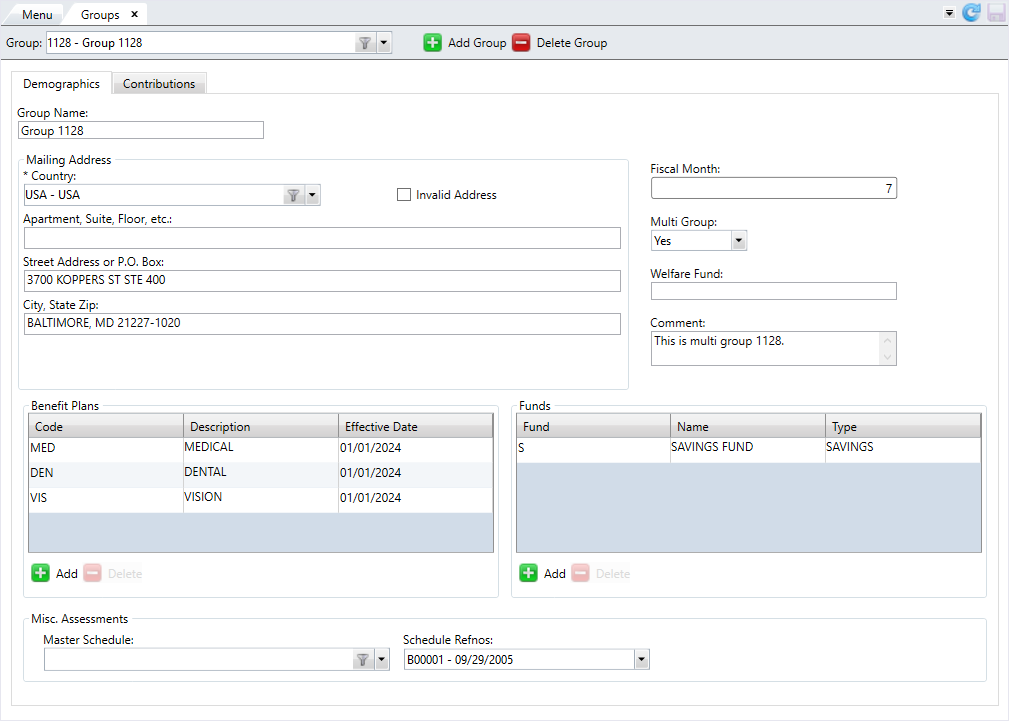
| Demographics tab | |
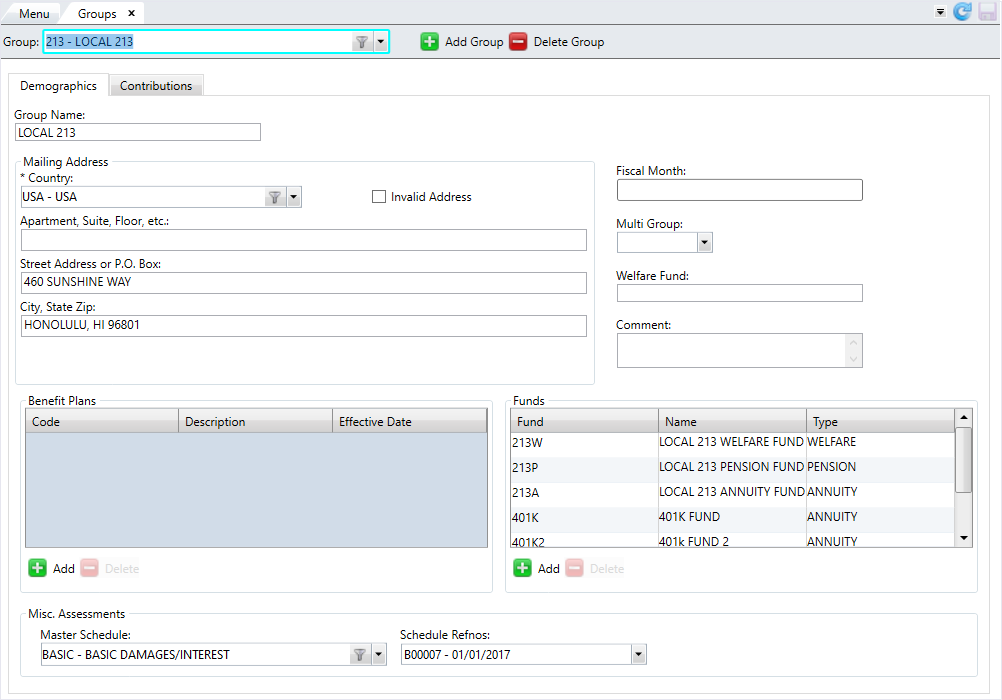
| Group Code* | The name of the group. Enter up to six (6) characters. |
| Group Name* | A description for the group. Enter up to 30 characters. |
| Mailing Address |
The address where the mail is delivered. The mailing address also displays on the Contact data tile
|
| Fiscal Month | The first month in the fiscal year used by this group. Enter a value between 1 and 12. |
| Multi Group |
Determines if the group code indicates multiple groups:
|
| Welfare Fund | The welfare fund associated with the group. |
| Comment | An optional comment about the group. |
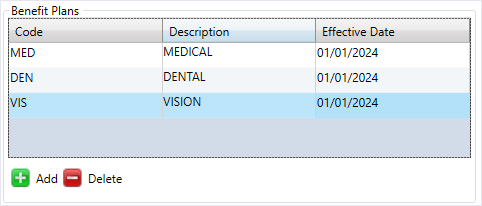
| Benefit Plans | The benefit plans associated with the group. |
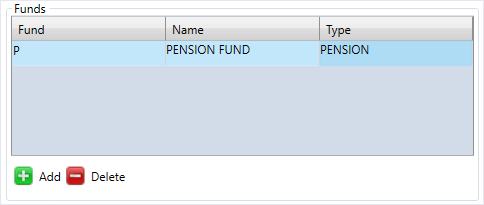
| Funds |
The funds to which the group contributes. Note: If a group code is linked to a local and the local is tracked on the member record, adding the relevant funds ensures that the correct funds are selected within Member Information (for example, <PR> and <AN>).
|
| Misc. Assessments Master Schedule | The master schedule to use for miscellaneous assessments. |
| Misc. Assessments Schedule Refnos | The schedule refnos for miscellaneous assessments. |
| Contributions tab | |
| One Check Per Report |
Determines if you need to enter a single check number in Fund/App/Shift level or report level. If on the report level, each Fund/App/Shift has the same check number:
|
| Default Group for Auto-Balance | The group number to auto-balance in Receipts Entry. |
| Default Deposit Date |
Determines if the deposit date defaults to the current date or the received date.
|
| Auto-Recipients Entry Flow | Specify the order of the report screens in Receipts Entry. |
| Default Member Detail CDO |
Determines if the group uses a default member CDO report template:
|
| New Member Status Code | The status code for the new member. |
| New Member Status Code From Date |
The start date for the new member's status code.
|
| EFT Default Draft |
The default EFT draft for this group. This field determines the bank information for the ACH file header section and where the debited employer monies deposit (via the offset in the ACH file). Note: If there's no value in the EFT Default/Pre-note Draft SAC setting first (Accounts 2-1, Option 1, SAC 51), this option is used.
|
| EFT Transactions |
Determines if the ACH file to the bank includes a single offset transaction or separate transaction by draft. Decide if the debits or credits to the employer are completed in one transaction or separate transactions by draft.
Note: If there's no value in the EFT Default/Pre-note Draft SAC setting first (Accounts 2-1, Option 1, SAC 51), this option is used.
|
| Class Code for "5" Record |
Indicates the default entry class code for the EFT 5 record at the Group level (CCD). Enter up to three (3) characters. |
|
Delinquency Grace Days |
The number of days after the remittance due date that a remittance can be received before it's considered delinquent. Enter up to 20 characters, including any special characters. If the remittance isn't paid within the grace days period, interest is charged, calculated from the remittance due date. For example, if a remittance is due on 15th of the month and has a 5-day grace period:
Note: If you don't specify the delinquency grace days for the employer agreement link and you change this setting, the delinquency dates on the remittance date records recalculate.
|
| Delinquency Method |
Specifies how delinquency is determined for each remittance under the agreement link. The agreement link setting overrides the group level setting. If both settings are undefined, then delinquency won't be calculated for due remittances for this agreement link's effective period. Select from one of the following methods:
|
| Delinquency Estimate Lookback |
The number of previously received remittances to “look at” when calculating a delinquency estimate amount for a delinquent remittance. Enter up to three (3) characters. The past received reports for the agreement link, each fund in the current contract, and sum the due amounts are checked. It then divides the total by the lookback value to get an estimate. If the employer doesn't have enough received reports, this process uses as many as are available and calculates an average based on the number it finds. For example, if the lookback is two, the due amounts from the last two received reports are added (for the agreement link and each fund in the contract) and divided by two to get the estimate. The agreement link setting overrides the group level setting. If the lookback is undefined at both the agreement link and group levels, there's no delinquency estimate calculated for the remittance. |
| Assessment Auto-Close Threshold Amount |
The dollar amount at which open receivables automatically close. Enter up to 10 characters. This setting is checked after a payment is made to an open receivable (in Employer Balance Transactions) and closes the receivable (changes the receivable status to C) if the remaining balance is equal to or under this threshold amount. If you don't enter a value in this field, the process looks at Account 2-2, SAC 196 for the threshold amount. Note: This setting doesn't apply to member-owned funds; member-owned funds don't automatically close.
|
| Custom Delinquency Estimate Subroutine |
Configure the delinquency estimate process to check the last work period for which contributions were posted. Enter up to 30 characters. If left blank, the delinquency estimate process is based on the contributions for the prior work period. Note: To generate estimates based on the last work period for which contributions were posted, you must enter a custom subroutine. Contact your basys representative for assistance with creating the subroutine.
|
| EFT From Employer Portal |
Determines if internal users (the fund office) can create EFT debit transactions when entering remittances for employers in Receipts Entry.
|
| Portal Payment Schedule |
Indicates which portal holiday payment schedule used by the group. Select the filter to display a list of portal schedules, along with their
|
|
EmployerXG Payment Page by Total |
Determines how the EmployerXG payment page applies total amounts:
|
| EmployerXG Post Amounts by Total |
Determines if the EmployerXG payment page posts total amounts:
Note: Set Account 2-2*316 to the same as
EFT Trans per Draft or Total) to validate EmployerXG Payment Page by Total and EmployerXG Post Amounts by Total. Contact Bridgeway for assistance. |
| Payment Plan Interest Damage Type | The damage type for the payment plan's interest. |
Add a Group
- Click
 .
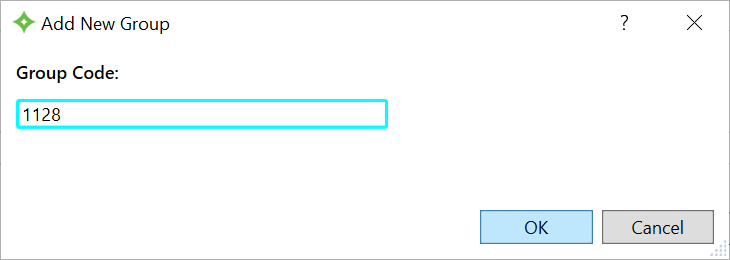
. - Enter the group code in the
Add New Groupwindow and click .
. - From the
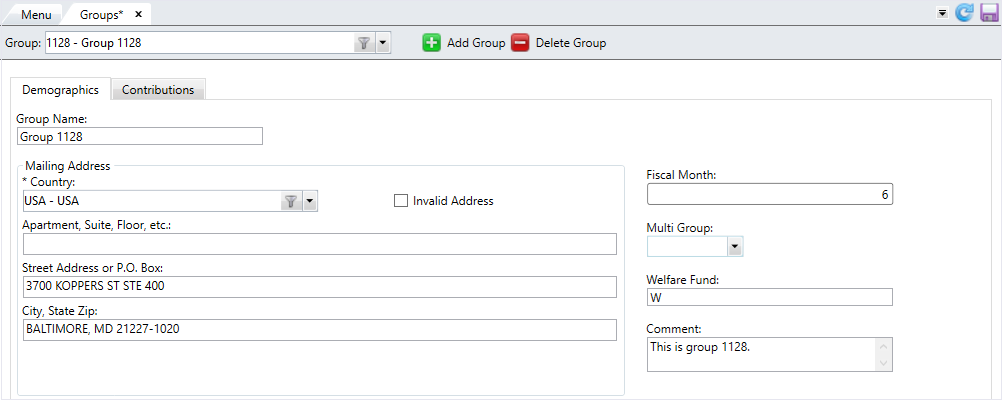
Group Informationtab, enter aGroup Name. - In the
Mailing Addresssection, complete the address fields. TheCountry Codedisplays automatically based on a SAC setting, but you can change it if needed. - Select the
Invalid Addresscheck box to mark the address as invalid. - Enter the
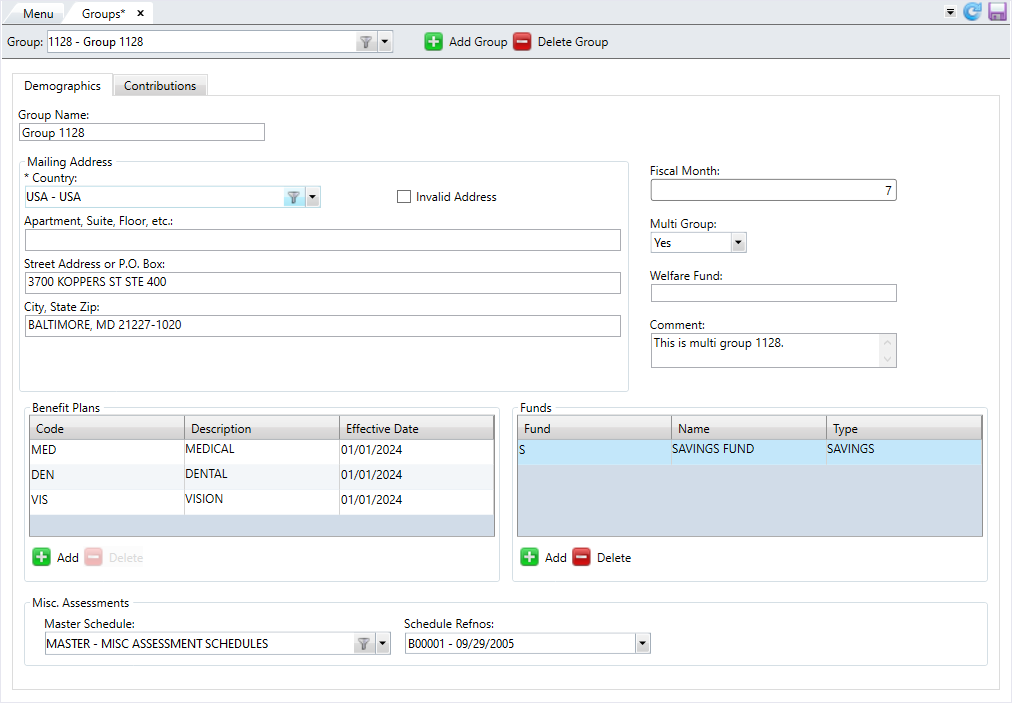
Fiscal Month. Enter a number between 1 and 12 to represent the month. - At
Multi Group, chooseYesto indicate that this group name represents multiple groups. Leave this field blank if the group name only represents a single group. - Enter the
Welfare Fundfor the group. - Enter an optional
Commentabout the group. - To associate a benefit plan to the group, click
 in the
 Benefit Planstable. - Enter the benefit plan name. The description displays automatically.
- Select the
Effective Datefor the benefit plan if needed. - You can add multiple benefit plans and the same benefit plan with different effective dates.
- To delete a benefit plan you added, select the row and click
 .
. - To choose the funds to which the group contributes, click in the
Fundstable. - Enter the
Fund. The fund's name and type display automatically. - Add as many funds as you need.
- To delete a fund you added, select the row and click .
- In the
Misc. Assessmentssection, select theMaster Scheduleto use for miscellaneous assessments. The available schedules display by code and name. - Choose the
Schedule Refnosfor the schedule. - Select the
Contributionstab to set up the contributions settings for the group. - At
One Check Per Report, selectYesif you need to enter a single check number in Fund/App/Shift level or report level. SelectNoor leave this field blank for multiple check numbers per report. - Select the
Default Group for Auto-Balance. - Choose the
Default Deposit Date:NorBlank—Won't default to current or received date.C—Defaults to the current date.R—Defaults to the received date.
- Select the order of the report screens in Receipts Entry in
Auto-Recipients Entry Flow. - Determine if there's a
Default Member Detail CDO. If you choseYes, select the default from the dropdown list. - Select the
New Member Status CodeandNew Member Status Code From Date. - In the
EFTsection, choose theEFT Default DraftandEFT Transactions. - If needed, enter the
Class Code for "5" Record. - In the
Delinquencysection, enter the number ofDelinquency Grace Days. - Choose the
Delinquency Method. - Enter the
Delinquency Estimate Lookback. - Enter the
Assessment Auto-Close Threshold Amount. - If applicable, enter a
Custom Delinquency Estimate Subroutine. - Complete the
Employer Portalsection if you use the portal. AtEFT From Employer Portal, decide if you can create EFT transactions in the Employer portal. - Choose if the group uses a holiday portal payment schedule in
Portal Payment Schedule. - At
EmployerXG Payment Page by Total, choose if the portal applies total amounts by remittance or by fund. - At
EmployerXG Post Amounts by Total, choose if the portal pays by total or by draft. - At
Payment Plan Interest Damage Type, select the damage type. - After reviewing the information, click
 to save the group.


Update a Group
- Select the group to edit from the dropdown list.
- Edit any of the information on the
DemographicsorContributionstabs. - After making your changes, click to save.
Delete a Group
- Select the group to delete from the dropdown list.
- Click
 .
. - At the message "Are you sure you want to delete this group code?" click to delete the group or
 to keep the group.
 - If you selected , the group is deleted from the list.