Create and schedule a task
Note: Any field with an asterisk * next to it or a red border around it must be completed before you can continue.
Go to: Home > System Administration > OpsXG > Task Scheduler
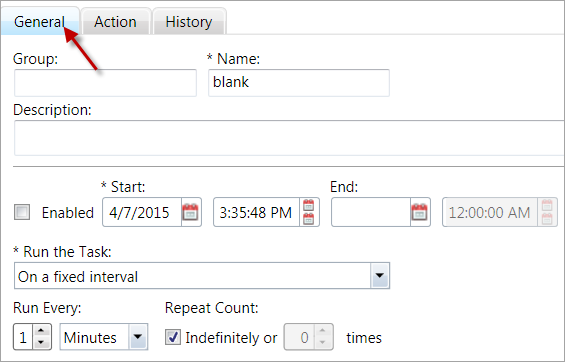
- On the General subtab, click
Add. - If applicable, type the task
Groupthe task is a part of. - Enter the task
Name. -
If necessary, enter a task
Description. - Select the
Enabledcheck box to enable the task to run, or leave it blank if you want to set up a task to run in the future. -
Select how to
Run the Task: by building and using a cron expression, specifying a fixed interval for the task to run, or when another task completes.- If you choose to use a cron expression to run the task, click the
Buildbutton to display the Cron Expression Builder. See Build a cron expression. - If you choose to use a fixed interval to run the task, indicate how often the task should run in the
Run Everyoption (for example, every two hours). Use theRepeat Countoption to indicate the length of time the task should run, eitherIndefinitelyor for a certain amount of time (for example, five times). - If you choose to use when a task completes to run the task, select the
Task Group(optional) and theTask Name(the task that should complete previous to your task starting). Select theExecution Delaycheck box and choose the time your task should begin relative to the previous task. For example, you could choose to have your task begin one hour after the previous task completes.
- If you choose to use a cron expression to run the task, click the
-
Click the
Actionsubtab.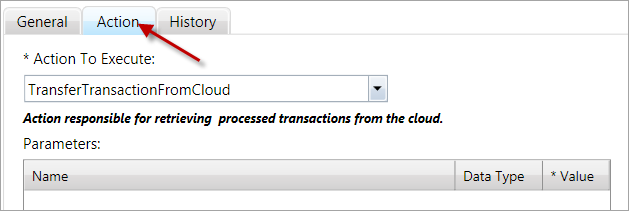
- In the
Action To Executefield, choose the action you're scheduling a task, for example,AutoArchiveTransactions. - If the action that you choose is associated with certain parameters, the
Parameterstable will display the appropriate parameters. Click in theValuenext to the parameter to enter a value for that parameter.- For example, if you choose the
AutoArchiveTransactionsaction, the ArchiveAfterXDays and the IncludeUnsuccessfulTransactions parameters display in the Parameters table. You might then enter a10for the Value of the first parameter and aYfor the Value of the second parameter. This indicates that you want theAutoArchiveTransactionsaction to archive files after 10 days and include unsuccessful transactions in the archive.
- For example, if you choose the
-
Click
 to apply your changes.
 - If you have more tasks to add for this trading partner, repeat the steps above.
- Click
 to save.