Create batch letters
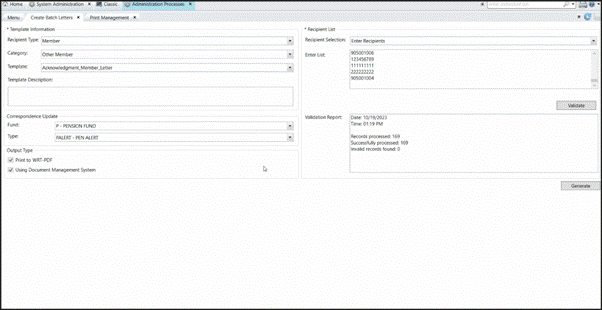
Create Batch Letter screen, select the Recipient type, category, and template. The screen automatically populates the specifications for correspondence and output based on the template's configuration.
Access Create Batch Letters
Go to: Home > Administration Processes > WriterXG > Create Batch Letters
* indicates a required field
| Option | Type | Description |
|---|---|---|
| Template Information | ||
| Recipient Type * | Dropdown | The type of recipient receiving the document (member, provider, dependent, employer, etc.). |
| Category * | Dropdown | A template group defined by the administrator (Assets, Claims, Disability, Year End, Other, etc.). |
| Template * | Dropdown | The name of the template. |
| Template Description | Text box | Document process information, next steps, or other helpful details. |
| Correspondence | ||
| Correspondence Fund | Dropdown |
The fund associated to the recipient's correspondence (document). Used when a template is related to correspondence and is recorded in the Correspondence tab if you have a document management system. The enclosures will include the generated letters. |
| Correspondence Type | Dropdown |
The recipient correspondence type related to the selected Correspondence Fund. Examples include, PEN ALERT, CORR Update, etc. |
| -The defined document output setup for each template. | ||
| Print to | Check box |
The print goes to the designated printer set up by the administrator. The printer's name displays. |
| Using Document Management System | Check box |
The PDF |
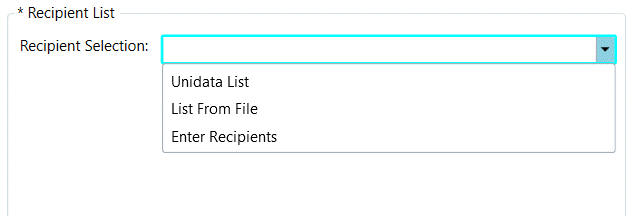
| Recipient List -You must select from at least one of these options. | ||
| Recipient Selection | Dropdown |
Select the recipient generation type:
|
|
Select List from File |
Browse window |
Click |
|
Enter Recipients |
Text box | Enter the recipient keys, separated by a semi colon (;), comma (,) or carriage return. Use the suggested keys. For a member, enter the SSN; for a provider, enter the tax ID; for an employer, enter the employer number. |
| Unidata List | Text box | Enter the name of the list, if applicable for the Recipient Selection. |
| Validate | Button |
If this button is active, click it to validate your recipient list. The result displays in the |
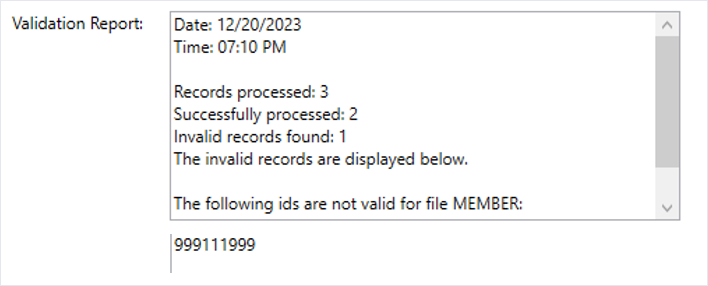
| Validation Report | Text box |
Results from the recipient list validation.
|
 to open a file browse window to search and select a recipient list file you have saved. The list can only be in a comma delimited (.csv) format or text (.txt) format. See
 Create Batch Letters screen change depending on the information you select.-
Select your
Template Information. - From the
Recipient Typelist, select the recipient for your batch documents (Member, Provider, Dependent, EmployerorBilling Account). - The following updates based on your configuration and the selected template.
- Select a
Categoryfrom the list displaying the document categories based on the recipient and your fund and role access. These correlate to the folders where the template exist on the Ecrion server. - The
Templatelist contains the associated templates based on the category and recipient. Choose the template to generate. - The
Template Descriptiondisplays a description or process information for the template. - A
Correspondence FundandCorrespondence Typedisplay automatically if the template has been configured to include them. If not, you can select them. - If you select a Correspondence Fund, the
Correspondence Typeis required. -
Using Document Management Systemcheck box is selected and you won't be able to change it. - In the
Recipient Listarea, choose how you'll supply the recipient list keys. There are multiple options for adding a list of recipients. You must select one of these options from theRecipient Selectiondropdown list. -
UniData List -
List from File -
Enter Recipients - List Name – The Unidata list name.
- Select List from File – Choose a file.
- Enter Recipients – Enter a list of IDs.
- If the
Validatebutton is active, you must click it to validate your recipient list and check for errors. The result displays in theValidation Reportbox. - The validation checks the records and lets you know the status of the records. The results display in the
Recipient List Validation Reportbox at the bottom of the tab. - If there are errors, the first 100 invalid records display.
- If the template is configured to exclude recipients with Invalid addresses, those excluded recipient IDs are listed.
- If there were any errors in your recipient list, those records are skipped. For example, if you process 10 recipients and two (2) are invalid, and you then decide to proceed without correcting the list, the eight (8) valid records still run.
- After verifying your recipient list, click
Generateto process the letter batch. A message displays letting you know how many records were processed. If you selectedUnidata List,List From File, orEnter Recipientsin theRecipient Selection, you won't be able to select this button until you validate the Recipient List.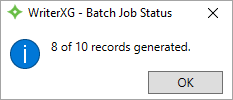
Template Information

Correspondence

Correspondence Type options in the list depend on the correspondence fund. The type indicates the kind of interaction with the recipient. Examples include Check Status and Welcome to Fund letter.Output Type

The Output Type displays how the resulting document is generated and where to find it. Each template has its own output setting which could include printing to a network printer or saving the document to a specified location. The selections can't be changed on this screen and will always display what has been configured for the template
Recipient List
Depending on what you chose for the Recipient Selection, the following fields may display: