To add or update the image that displays in the banner—the area at the top of every page—follow these instructions.

-
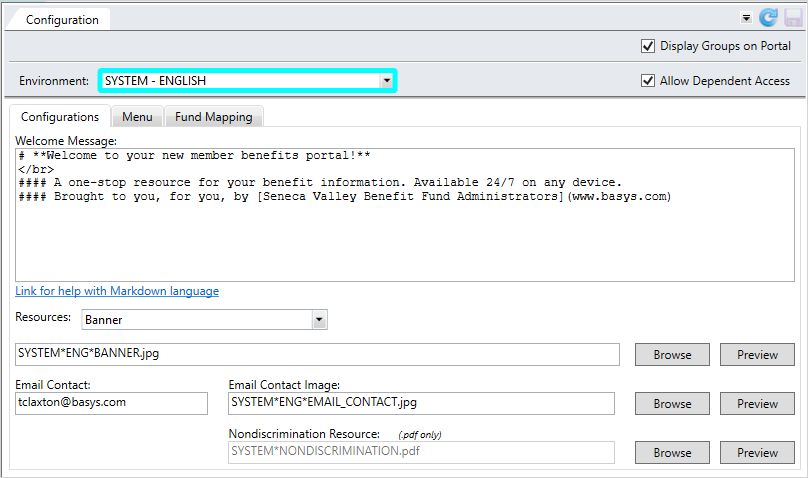
Access the Configuration tab and Configurations subtab.
 CONFIGURATIONS Subtab field descriptions
Option Type Description Display Groups on Portal check box Select this option to allow members to view their assigned group configurations. Allow Dependent Access check box Select this option to allow members' dependents to create their own accounts. Environment
list This list contains all existing environments for your office. Select the one for which you're setting or changing options.
Welcome Message text box This is the message that displays on the MemberXG home page after the user has logged in. It is written in Markdown language. Resources
list This list contains specific information which displays on portal pages. Select an item to update such as the banner, privacy policy, terms of use, a security policy, or contact information. The banner displays at the top of the pages and all other resources display as links in the bottom (footer) of all pages. Browse Box
text box After clicking
Browseand selecting a file (this is dependent on the Resource chosen), the file name displays in this box.- All documents (policies, terms of use, and contact us) must be in a PDF A file format designed to present documents the same way on different devices. Typically, PDFs are not editable. format.
Banner- Select a png image within the size of PX (60pt) high by 200px (266pt) wide. The banner image displays at the top of all pages.
Browse
button Select this button to display a browse window, where you can search for and select a file. Preview
button This button enables you to preview the image or file you selected.
Note: You might need to choose an application from a list to associate the file to before viewing the file.
Email Contact
text box The MemberXG site contact email address-signature file (the From name in any email sent to members from the portal).
Email Contact Image text box After browsing and selecting an image, the image name displays in this box. This image will display at the bottom of the member's email correspondence as part of the email signature.
Hint: Make sure the image size is appropriate for an email (e.g. .91” x 1.74”).
Nondiscrimination Resource
text box After clicking
Browseand selecting a nondiscrimination file, the file name displays in this box.- The file must be in a PDF A file format designed to present documents the same way on different devices. Typically, PDFs are not editable. format.
- The selected PDF displays in a separate window when launched from the Nondiscrimination link at the bottom of the MemberXG portal page.
- All documents (policies, terms of use, and contact us) must be in a PDF
- Select the portal environment to update, from the
Environmentlist. - Select
Bannerfrom theResourceslist. - Click
Browseto display a browse window. - Locate and select an image file (.jpg, .bmp, or .png) from the browse window.
- Once you’ve selected the image, click
 to apply the change. The banner image now displays on the portal.