Create a New Contract
![]() A written contract between the employer and union that governs what and how employers pay towards benefits for their employees. The CBA contains the wages, hours, and other working conditions negotiated for members and also determines how much the employer should pay for benefits, how that payment is to be broken out by fund, and when the payment is due. In the basys system, an agreement is the CBA and links all like contracts under it.) for a specific period (contract dates can’t overlap under an agreement).
A written contract between the employer and union that governs what and how employers pay towards benefits for their employees. The CBA contains the wages, hours, and other working conditions negotiated for members and also determines how much the employer should pay for benefits, how that payment is to be broken out by fund, and when the payment is due. In the basys system, an agreement is the CBA and links all like contracts under it.) for a specific period (contract dates can’t overlap under an agreement).
Once a contract is set up, it must be linked to an agreement (see Add, update, or delete an agreement). Lastly, the agreements must be linked to employers (see Link or add an agreement to the employer).
Once the agreement link is completed, remittance due records are created. See Contracts for more information.
Setup Steps
Go to: Home > Codes and Criteria > Contributions Contracts > Contracts
-
Click
 .
.
-
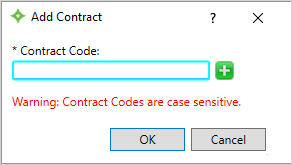
Enter a contract code or click
 to generate a contract code, then click
 OK. The contract code is case-sensitive. Use your office’s standard for the contract code or create a standard for your contract codes using values that will help you identify the contract. You can enter up to 30 characters.Note: If there are contracts with the same code, a message displays to alert you. Depending on your permissions, overwrite ability might be allowed or restricted. -
Enter the
Contract Namethat will display in the Employer portal.Hint: Provide a descriptive name for the contract that employers will recognize, as it might display in their portal remittance descriptions depending on your employer portal configuration. See OpenRemittanceDescription. -
Click
OK.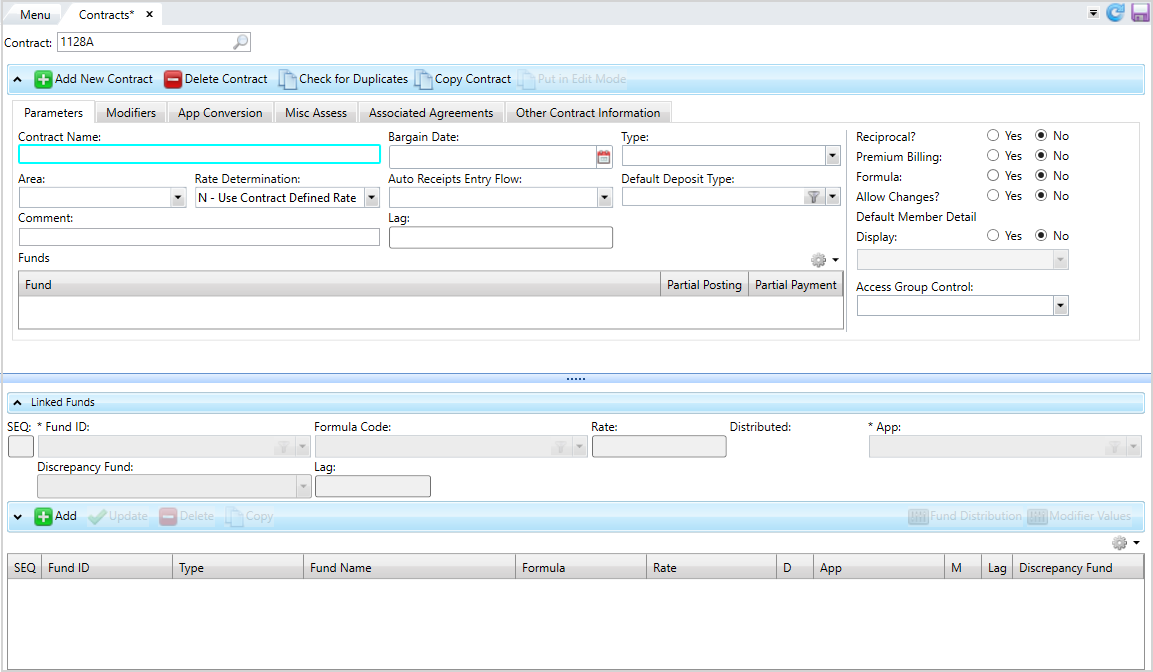
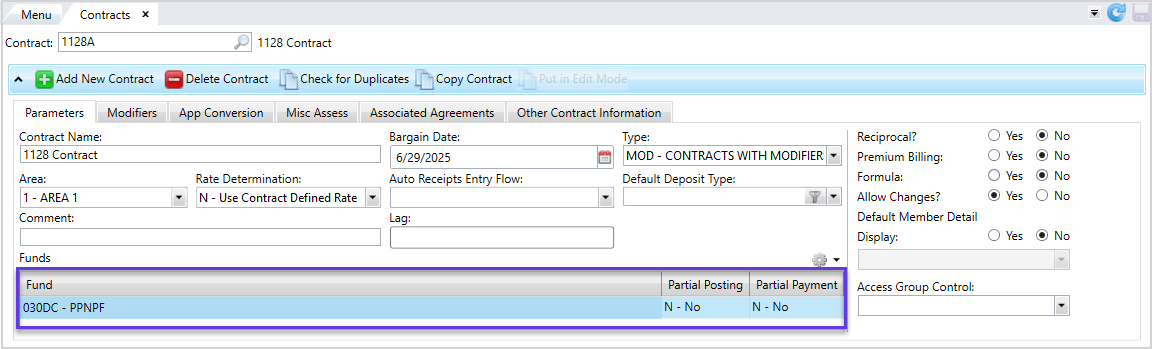
A blank contract displays. Begin entering the contract information.
-
Complete the
 Parameters
-
Click the
Parameterssubtab and update the information as needed.Parameters field descriptions
Field Name
Description
Contract Name
The contract name. You can enter up to 25 characters.
Bargain Date
The contract bargaining date.
Note: Depending on your system administration configuration, if you change this date and there are any posted remittances that fall outside the bargaining date, a message could display. Contact your representative to set or change System Administration Control (SAC) settings. Don't change SACs without first consulting Bridgeway, as changing them can affect other functions and global system settings.Type
The contract type. Go to Home > Codes and Criteria ˃ Contributions Contracts ˃ Contract Type to add, update, or delete contract types.
Area
The employment location or a work site (e.g., a building name or geographic area). Go to Home > Codes and Criteria ˃ Contributions ˃ Area to add, update, or delete areas.
Rate Determination
Indicates if the rate is determined by the reported quantity and reported amount instead of the contract rate.
N—No, rate is determined by the contract defined rate. This is the default.Y—Yes, rate is determined by the reported quantity and reported amounts.P—Operator is asked if the rate should be changed based on the reported quantity and amount.
Auto Receipts Entry Flow
The
Receipts Entryflow code, which determines the order the remittance entry screens display when entering remittances. Go to Home > Codes and Criteria ˃ Contributions Remittances ˃ Remittance Entry Flow to add, update, or delete flow codes.Default Deposit Type
The default deposit type for when deposits related to this contract are made.
Comment
Additional contract information entered by an operator.
Lag
The delay period in crediting hours for eligibility determination.
Reciprocal?
Indicates if the contract includes reciprocity
Provides a means for employees to work for one local and have the benefit credits applied to the local where they are members..-
Yes—This contract includes reciprocity. If a member has a reciprocity authorization on file during remittance entry, the member will be entered on a report. If the member doesn’t have an authorization on file, an error message will display, and the operator can choose to continue. -
No—This contract doesn't include reciprocity. This is the default.
Premium Billing
Indicates if the contract is a Premium Billing
Billing used in a single employer environment where the employer is billed directly for the coverage and the member is eligible for coverage until the member or the coverage is terminated. contract. The default is No.Formula
Determines if the contract uses contract formula rates and enables access to editing the formula fields. This must be
Yesto add a formula code to a linked fund.-
Yes—The contract uses rate formula codes. -
No—The contract doesn’t allow access to this field. This is the default.
Allow Changes?
Indicates if the contract can be changed once employer receipts have been posted. The last posted employer remittance reference number shows next to the field label.
-
Yes—Allow an operator with update or delete access to change a contract that has postings without a warning. -
No—Changes can't be made to the contract without putting it in edit mode (see Contract edit mode). This is the default.
Default Member Detail Display
The default Customer Driven Output (CDO) criteria to display on the Remittance Entry, Member Detail screen.
-
Yes—Select the CDO criteria from the list. -
No—The universal default is used or a window displaying criteria names to select from will display. This is the default.
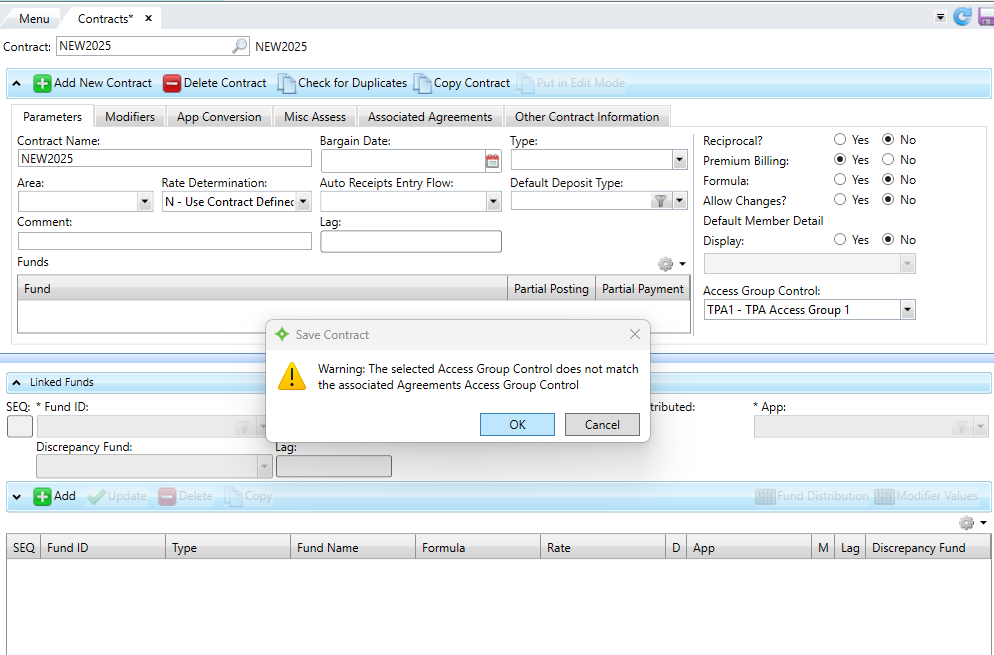
Access Group Control The associated Access Group Control for the contract (see Agreement and Contract Control). You can only apply this contract when you're in the access group. Only access groups that you're granted permissions to view display in the list.
Important! The contract and agreement must have the same access group.Fund table Fund
The fund(s) linked to the contract.
Partial Posting
Indicates if an operator must post an amount to the fund when entering a remittance.
-
Y—Yes, allow partial posting. The operator doesn’t have to post an amount to this fund on a remittance. This fund won't display in the portal. You can set toNat the agreement link level to override. -
N—No, don’t allow partial posting. The operator must post an amount to this fund on a remittance. This is the default, and can't be overridden on the agreement link level.
Partial Payment
Indicates if an employer can post an amount less or more than the amount due on the employer portal. Fund office operators can always make a partial payment during remittance entry.
-
Y—Yes, allow portal employers to under or overpay. -
N—No, don’t allow portal employers to under or overpay. The operator must post the exact amount due for the fund in a remittance. This is the default.
Note: If this setting isNat the contract level, you can't change it toYat the Agreement Link level. If you want to allow any employers to partial pay, set the contract level toY, then turn it off at the agreement link level for employers who shouldn't have the option.Hint: Contract parameters can also be set at the group and agreement link levels. See Agreement overview. If you want a contract’s member detail in remittance entry to differ from your usual default display, or if the contract’s default flow or deposit type should be different from the usual, you can enter your contract-specific preferences here.
-
-
When a contract specifies that contribution rates vary based on member characteristics, assign modifiers to a fund/app/rate combination to further define contribution rates. For example, a rate modifier differentiates an employee who works the third shift (night hours) and receives a higher rate than someone working first shift (day hours). Both shifts would be entered as separate modifiers.
Add any known modifiers for the contract. Modifiers must be added before any fund/rate rows.-
Click the
Modifierssubtab.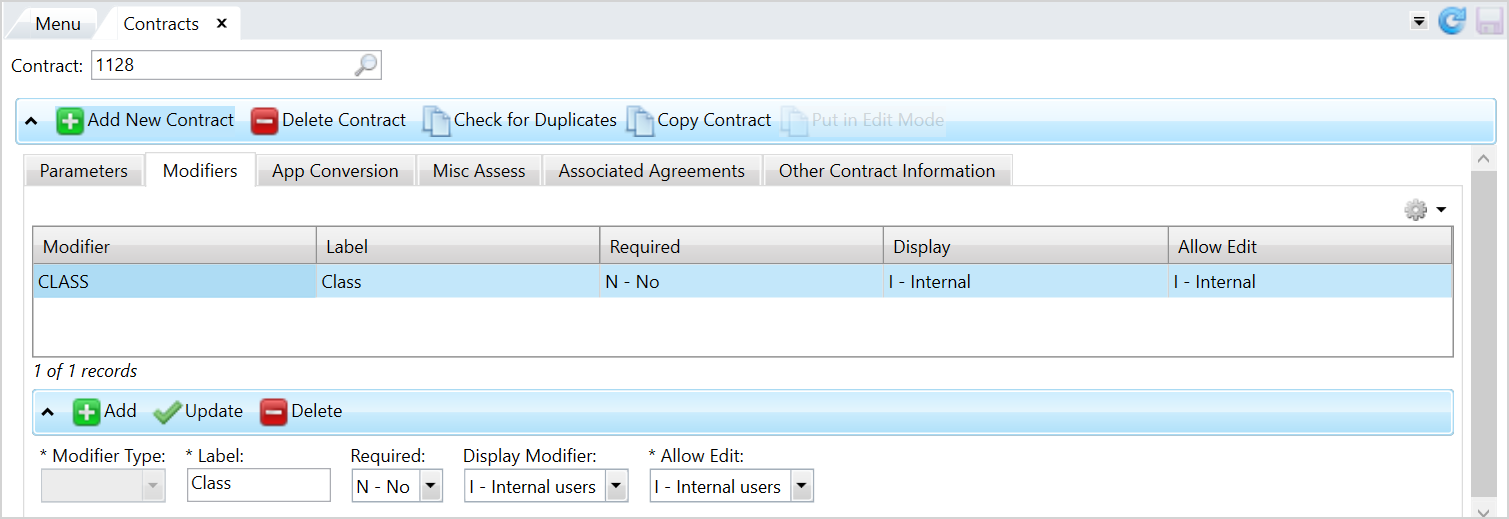 Modifier field descriptions
* indicates a required field
Option
Description
* Modifier Type
The modifier type to further classify rates based on shift, skill, or other variables. The available modifiers are
AREA,CLASS,EMPLOYER,GROUP,LOCAL,SHIFT, andSTATUS_CODE.* Label
The modifier label to display in the employer portal and during remittance entry. A default label for the modifier displays but you can change it.
Required
Determines if a modifier is required data in the employer portal and during remittance entry.
Display Modifier
Determines which users can see the modifier in the employer portal or during remittance entry.
-
I-Internal users—Only fund office operators can view the modifier on the Remittance Entry, Member Detail screen. -
E-External users—Only employers can view the modifier in the Employer portal. -
B-Both Internal and External users—Both fund office operators and employers can view the modifier in the Employer portal and during remittance entry.
* Allow Edit
Determines who can change the modifier’s default value (updating the value won’t update member status dates) in the employer portal and during remittance entry.
-
I-Internal users—Only fund office operators can edit the modifier on the Remittance Entry, Member Detail screen. -
E-External users—Only employers can edit the modifier in the Employer portal. -
B-Both Internal and External users—Fund office operators and employers can both edit the modifier. -
N-No edits allowed—Neither fund office operators nor employers can edit the modifier.
-
- Click
 .
. - Select the
Modifier Typefrom the list and enter theLabelto display in the employer portal and during remittance entry, or pressEnterto accept the default. -
Select how the modifier will display during remittance entry and who can edit it.
- Click
 to apply the selections and add the modifier to the contract. Add as many modifiers as needed.
 - Click , then click
 .
.
-
-
Add fund/rate/app rows in the bottom section of the screen. Every contract needs fund/rate/app rows, but not every contract will need modifier values or fund distribution. Hint: Drag the slider to expand and collapse the
Linked Fundsinformation.-
Click
.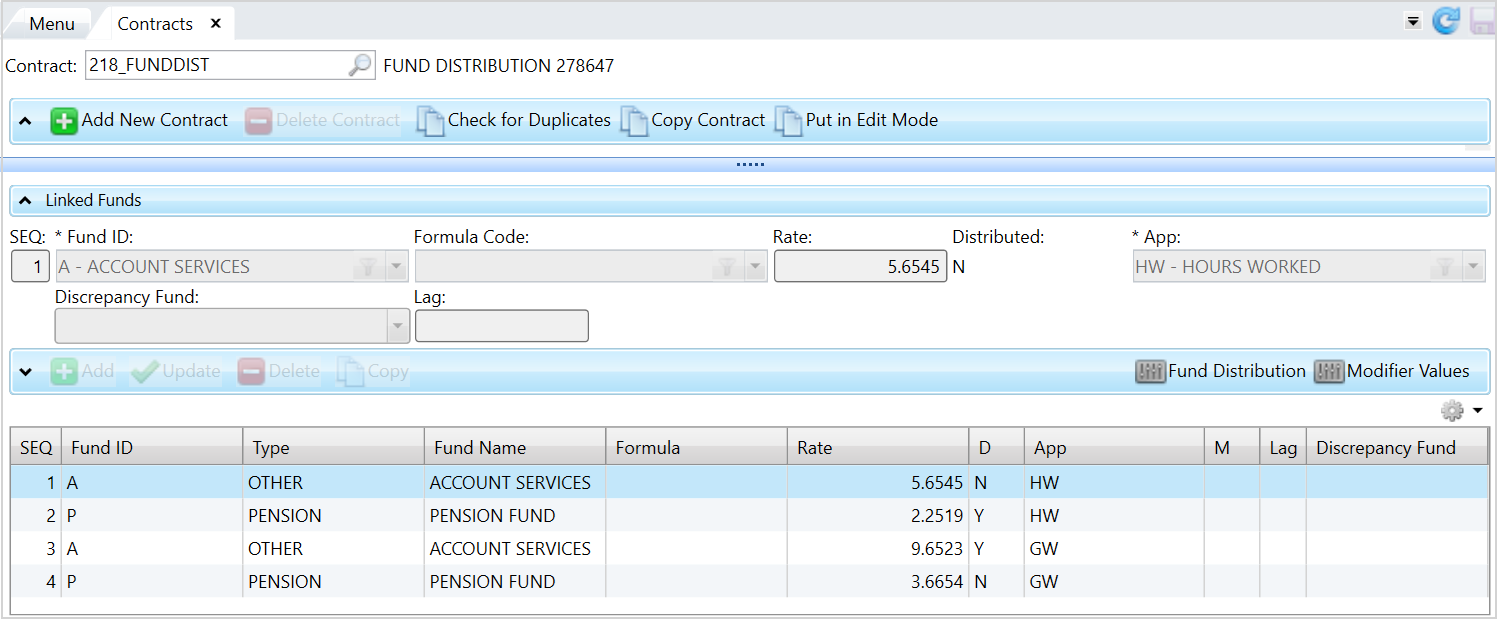 Linked Fund field descriptions
* indicates a required field
Option
Description
SEQ
Select a row and change the sequence number to update the fund/rate/app row order. Enter a sequence number to reorder the row (for example, enter
1to bring the fund row to the top of the list).* Fund ID
The fund code associated with the contract.
Formula Code
User-defined code that provides the ability to change the final calculated contract rate during receipts entry. If the list is grayed out, it’s unavailable and formulas aren’t enabled for the contract.
Rate
The percentage or set amount the employer contributes per quantity unit (based on the employee's hours worked, gross wages, etc.). This rate applies to the fund/app/modifier (row) combination.
Distributed
Indicates whether contributions to a fund are distributed among multiple funds.
-
Y—Yes, contributions are distributed to multiple funds. -
N—No, all contributions go to the fund listed in the row.
* App
The quantity identifier for the unit of work to which the contract rate is applied (hours, gross wages, weeks, etc.). For example, an HW (hours worked) app is assigned to calculate the employer’s contribution amount based on the number of hours the employee worked.
Discrepancy Fund
The alternate fund for discrepancy accounting where all employer underpayments and overpayments are tracked. The discrepancy fund is usually set up with a rate of 0.
Lag
The number of lag months associated with the fund/rate/app row.
Fund Distribution
Displays a window to set up fund distribution for the fund/rate/app row.
Modifier Values
Displays a window to choose or update the rate modifier values for the fund/rate/app row. Note: A fund/rate/app row with no rate (blank or null) won't display during remittance entry, but a fund/rate/app row with a rate of zero will. -
- Select the fund from the
Fund IDlist or click to select from a window showing additional detail.
 -
Enter the
Rate.Hint: The rate order matters. The last rate row for the fund/app combination shouldn't have a modified rate and will be used as the default rate. During remittance entry, if an operator enters a member modifier value that isn’t defined in the contract, that member will receive the default rate. To change the row order, select a fund/rate/app row and change theSEQnumber. - Select an
Appcode from the list. - Continue adding fund/rate/app rows until you have a row for each fund/rate/app combination in the contract. If there are any issues with rates, (duplicate rows, rates not equaling full rate for distributed funds, etc.) a message will display.
- When you’re done adding fund/rate/app rows, click , then click .
-
- If needed, apply any modifier values to identify the members that receive the rate.
-
To apply modifier values to a fund/rate/app row, select the row to update and click

Modifier Values. The modifier types display in a window.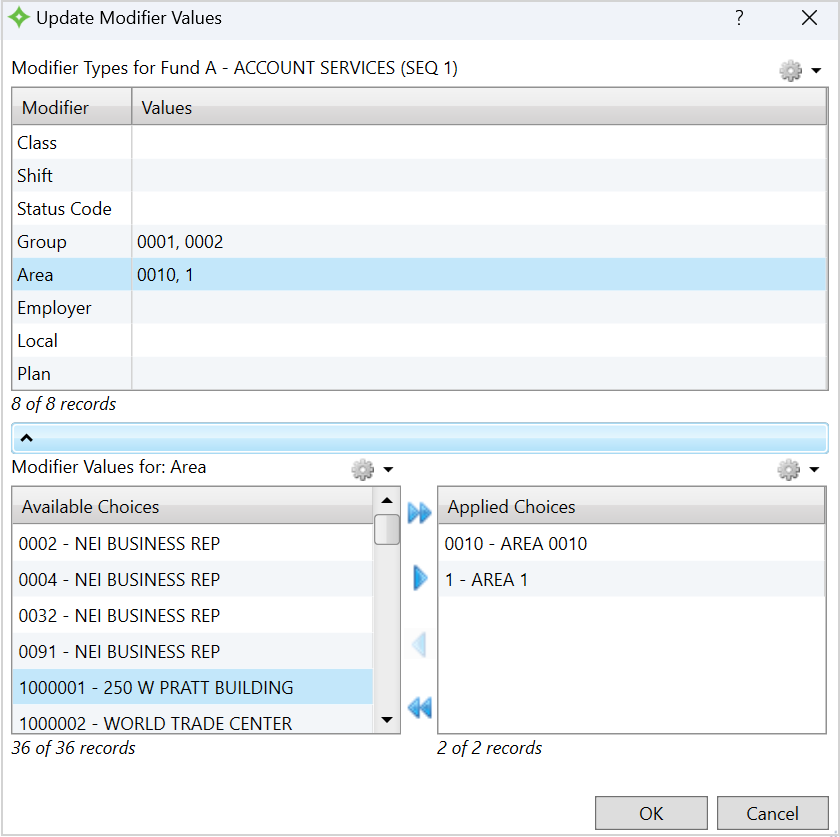
- Select the
Modifierin the upper table. - Add or remove
Modifier Valuesto the right-side list using the right and left
  arrows. To help select the
 Available Choices, you can filter the table to choose your options. As well, select and
and  to move multiple options between the tables at the same time.
 - Any value selected in
Applied Choiceswill be used for the fund/rate/app row. - Click
OKto apply the modifier and values to the fund/rate/app and close the window. - Click , then click .
-
Update any funds to allow partial payment or posting from the employer portal. By default the funds are set to not allow partial payment or posting. Update any funds to
allow partial payment and posting from the employer portal.- From the
Parameterstab, find the fund to update. - Double-click the
Partial PostingorPartial Paymentfield and change the value. - Click to save.
- From the
- If the contract has a linked miscellaneous assessment schedule or you need to add app conversion formulas, make the appropriate updates (see topics below for help).
-
Once you’ve finished adding all parameters, fund rate rows, and all other settings, click
. Depending on the system configuration, a dialog box could display enabling you to link the contract to a new agreement.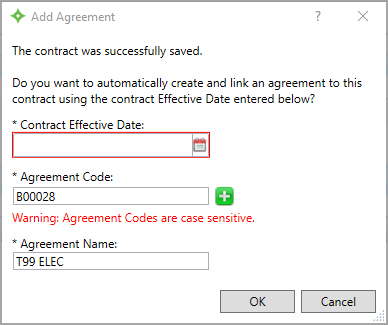
If not, navigate to the agreement link menu (see Agreements) to link the contract to an existing agreement.
- If using access group controls, your contract's access group match the associated agreement's control. See Access Group Control for more information.
- Test the contract by your office standards, and make adjustments as needed.
Fund distribution
Contributions made to one fund in a contract (a "parent" fund) can be allocated to multiple "child" funds on the member level. ![]() Set up fund distribution for funds if necessary.
Set up fund distribution for funds if necessary.
-
Select the fund/rate/app row for the distribution and click
Fund Distribution.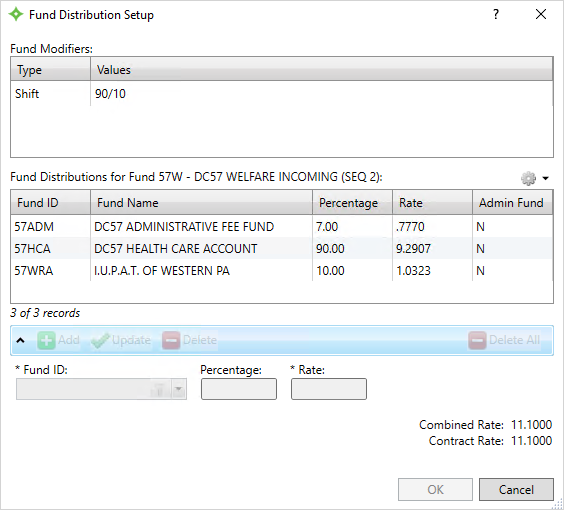
- Click .
- Select the
Fund ID(child fund) to distribute funds to from the list. - Determine if you want to update the fund distribution by
PercentageorRate. - Enter a
Percentageto determine the breakdown of distributed rates, where the percentage is from the total rate, or if you're using an Admin fund, a percentage of the remaining rate. - Enter the
Rate. The combined rates must equal the "parent" fund's rate. The total combined rates for all the "child" fund rows must equal the contract rate for the "parent" fund; if they don’t, you'll receive an error message. - Click .
- Continue to add funds and rates until the
Combined Rateis equal to theContract Rate. ClickOKto return to the previous screen. - Click , then click to save.
Percentage field.Copy a Linked Fund
Copy a fund/rate/app row along with its fund distribution and modifier values information.
![]()
- To copy a fund/rate/app row, select the row and click
 .
. - The sequence number updates to the next available number. The copied row's fund/app/modifier information must be different from the original line's.
- Edit the information as needed.
- Click , then click to save.
![]()
Add App Conversions
App conversions define how to display and prompt “Prompting” refers to displaying a default quantity based on a conversion that can be accepted by pressing ENTER. for member app![]() The quantity identifier for the unit of work to which the contract rate is applied (hours, gross wages, weeks, etc.). information during remittance entry and how to convert "Conversion" refers to computing or manipulating an app quantity using functions, expressions, or conditional statements. In many cases, the conversions and prompts are interrelated, with decisions to prompt or not based on if the conversion should be reviewed. the app data. Change the apps' order to change how data is calculated and entered on the
The quantity identifier for the unit of work to which the contract rate is applied (hours, gross wages, weeks, etc.). information during remittance entry and how to convert "Conversion" refers to computing or manipulating an app quantity using functions, expressions, or conditional statements. In many cases, the conversions and prompts are interrelated, with decisions to prompt or not based on if the conversion should be reviewed. the app data. Change the apps' order to change how data is calculated and entered on the Receipts Entry screen. For example, in calculations where one app must be entered before a second app to perform the calculation (e.g., App 1 is 50% of App 2), the order can change the calculation.
Conversion refers to calculating or manipulating an app quantity using functions, expressions, or conditional statements. In many cases, the conversions and prompts are interrelated, with decisions to prompt or not based on if the conversion should be reviewed.
Employer Receipts Entry screen to make entry easier and faster.![]() Set up app conversions, if necessary.
Set up app conversions, if necessary.
-
Select the
App Conversiontab to display all contract app conversions for the fund/rate/app rows, in the order they were added.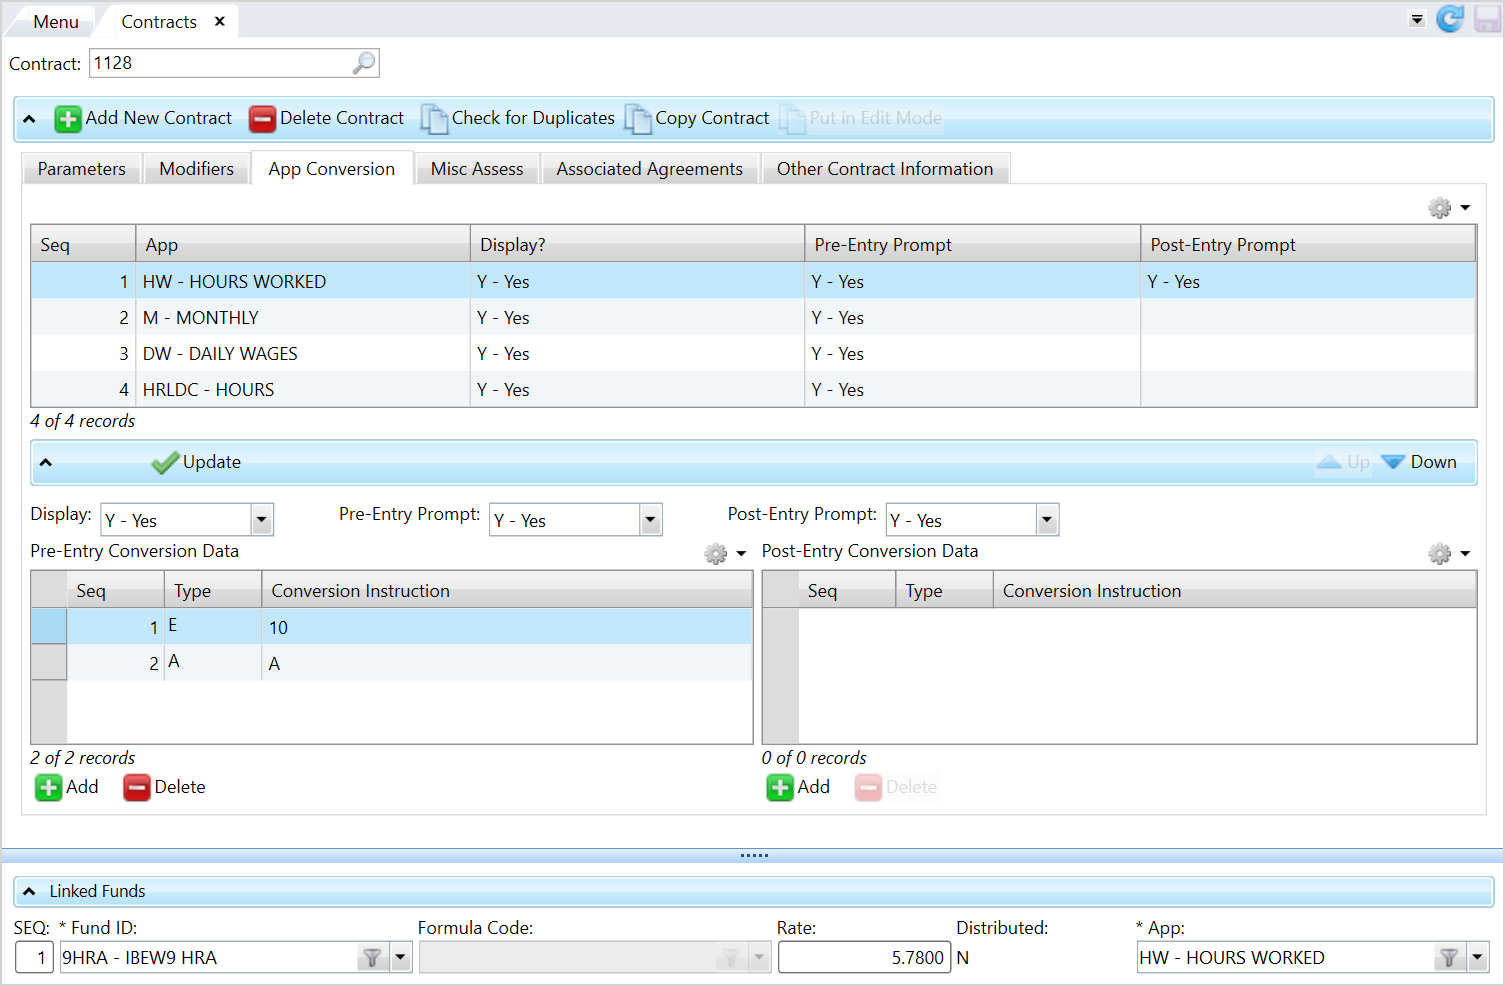 App Conversion field descriptions
Option
Description
Seq
The order the apps are entered during remittance entry. This doesn't affect the app order on the
Reported Amountsscreen.App The selected app for the contract. Display
Determine whether the app displays on the
Member Detail Entryscreen.Pre-Entry Prompt
Determine whether the operator is prompted for a pre-entry app quantity when adding a member to a remittance.
-
Y—Yes, prompt the operator for the pre-entry conversion app quantity. -
NorBLANK—No, the pre-entry conversion app quantity is entered by default, and the pre-entry conversion recalculates if the existing member is edited. Don’t answerNif there aren’t any conversions; a blank or null entry will be entered by default.
Note: For the employer portal, you can set up pre-entry conversions to recalculate quantity formulas whenever users add new members or edit existing members. See the AlwaysCalculateConversions configuration setting.Post-Entry Prompt
Determine if the operator is prompted for a post-entry conversion app quantity before the remittance shows on the Member Detail Entry screen.
-
Y—Yes, prompt the operator for the post-entry conversion app quantity (hours, percentage, etc.). -
NorBLANK—No, don’t prompt the operator for the post-entry conversion app quantity. Don’t answerNif there aren’t any conversions; a blank or null entry will be entered by default.
-
- Select the app row to add or edit a conversion calculation.
- Choose if you want to
Displaythe app in Member Detail and Receipts Entry. - If you have conversions, choose if the operator is prompted for the for app quantities and if they're prompted before (pre-entry) or after (post entry) entering a remittance. If there are no conversions, leave these values blank.
- To enter conversion instructions, click .
-
Select a conversion
Typefrom the list, then enter theConversion Instruction.Conversion formula types
Conversion Type
Instructions
Example
E—Expression
All UniBasic operators are supported, including the following. Use parentheses to enforce hierarchy; otherwise, normal expression hierarchy is enforced.
Arithmetic operators: +, -, *, /, ^
Relational operators: =, >, <, <>, >=, <=
Boolean operators: and, or
Ordering: (,)
Special commands: @PO-Prompt Override - reverse the conversion prompting status set in the contract.
The '=' refers to an equation not an assignment.
Refer to fields and previous conversions (variables):
-
@E# - the entered quantity for the specified app variable on the remittance, e.g., @E1 refers to quantity entered for the first app.
-
@C# - the converted quantity for app# on the report
-
@V# - value from a previous line of the same conversion
-
@P - member's plan on the report being entered
-
@S - member's shift on the report being entered
-
@F - payroll From Date
-
@T - payroll Thru Date
-
@D - value returned from a custom subroutine (conversion type “F”)
@E4+@E5F—Function
UniData functions:
-
MAX(X,Y)—the greater of the two values X and Y.
-
MIN(X,Y)—the lesser of the two values X and Y.
-
INT(X)—the integer value of X.
-
MOD(X,Y)—X module Y - the remainder of the division of Y into X.
-
ABS(X)—the absolute value of X.
-
CALL(X)—the value returned by external subroutine X. The value on the previous conversion line is the input parameter of the subroutine.
Call a custom subroutine:
CALL(S.MPRE.CON.MEMSTS.CUST)C—Conditional
Returns one of two expressions based on the evaluation of a Boolean expression.
If the Boolean expression evaluates to TRUE, then the first expression is evaluated, and the result is the expression result.
If the Boolean expression evaluates to FALSE, then the second expression is evaluated, and its result is the expression result.
IF exp1 THEN exp2 [ELSE exp3]
IF @E4>=”1960.00” THEN “1960.00 ELSE @E4Expression:
@V1*[RATE per SGW]A—Append to the last line
If a conversion is too long for one line, an
Aline is treated as a continuation of the previous line. -
- Click to apply the conversion changes. Continue the above steps for each app.
- Re-order the apps as needed to determine the order the apps are displayed during remittance entry and the order the apps are entered. Keep this in mind when determining how to configure any app calculations that might need a value from one app before determining the value of a following app. Use
 to re-arrange the app order. Any value selected in
 Applied Choiceswill be used for the fund/rate/app row you selected. - When you’re finished with the apps, click , then click .
Miscellaneous assessments
If a miscellaneous assessment master schedule has been set up and is required for this contract you can update the options. If no schedules exist, no selections are enabled. See Add or update miscellaneous assessments for more information.
![]() Set up miscellaneous assessments, if necessary.
Set up miscellaneous assessments, if necessary.
-
Select the
Misc Assesstab. Misc Assessments field descriptions
Option
Description
Miscellaneous Assessment Master Schedule
The master schedule the
Schedule Refnois linked to.Schedule RefNo
A system-generated identifier for the attached schedule (effective as of the specified dates). Choose from the list if there are multiple schedule refnos.
Assessment/Payment for All Rpt
Indicates whether an open assessment and payment are created for all employer remittances.
-
Y—Yes, create an assessment for the computed amount and a payment for the reported amount, if no other assessments are made. -
N—No, the assessment or payment aren't created. Choose the default underage and overage assessment types fromApply Which Type as Default for Overage BalancingandApply Which Type as Default for Underage Balancing.
If YforAssessment/Payment for All ReportsAssessment Type
The assessment type that will be assigned to the transactions created if
Assessment/Payment for All Rptis set toY.Assessment Fund
The fund to use for the transactions created if
Assessment/Payment for All Rptis set toY.If NforAssessment/Payment for All ReportsApply Which Type as Default for Overage Balancing
The default overpayment miscellaneous assessment type used during remittance entry.
Note: This setting overrides the system administration control setting value that shows below the list .
Apply Which Type as Default for Underage Balancing
The default underpayment miscellaneous assessment type used during remittance entry.
Note: This setting overrides the system administration control setting value that shows below the list .
-
- Make the appropriate selections.
- When you’re finished, click , then click to save.